Art of Macro Photography

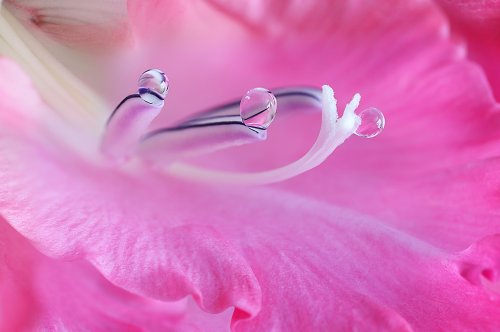
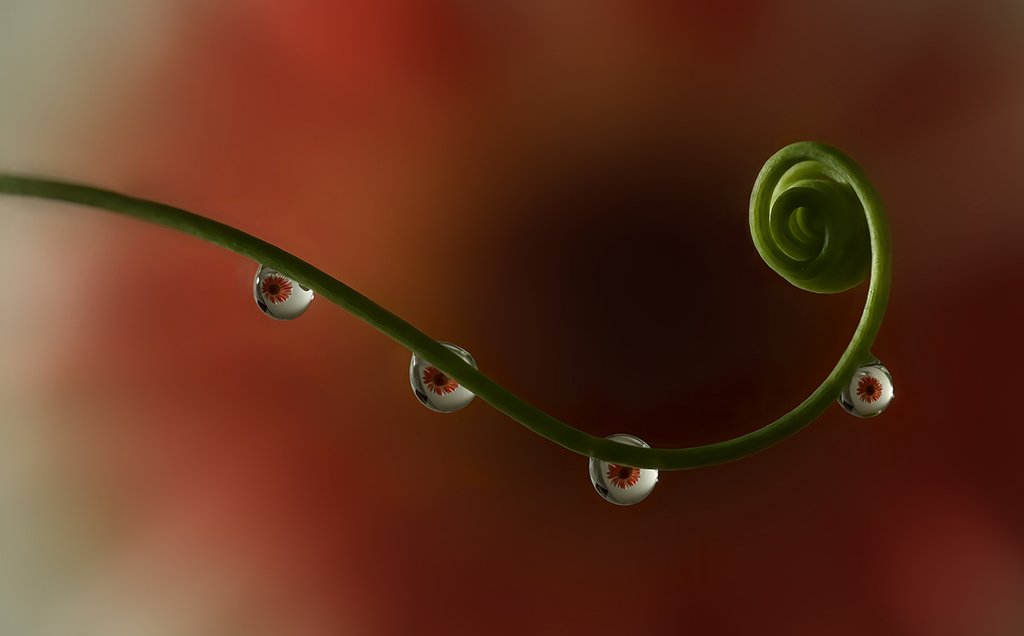
Pic - 1
What is Macro photography?
Close-up means you're just shooting from a short distance from the subject. You can use virtually any lens to achieve close-up photos. Macro means you're taking super close-ups of objects at 1:1 or greater. Meaning, the size of the image on your sensor is equal to the size of the object you are photographing in real life or it’s larger than life-sized.
Why Macro photography:
You can create a large detailed image of a small object that is normally too so small and thus not clear to the naked eye like an insect, water drops, interior of a flower etc. You are able to show to the world the minutest beauty that most of the people normally skip.
It is easily manageable anywhere and thus its popularity amongst beginners as well as professionals.
One can simply try macro by adding a diopter lens to the front of the existing standard lens which would impart a fair degree of magnification; one can even use extension tubes between the normal lens and the camera body; one can also acquire a set of macro bellows and place them between lens and body or one can try by using a reversing ring that allows one to fit the lens on backwards, which improves the lens’ close-up resolution and allows one to focus much more closely. But the best option is, if you are really keen on Macro photography, to buy a macro lens which is far superior to all the options mentioned above.


Pic - 2
Working distance:
The distance between the subject and the front end of the lens is referred to as the working distance. A larger working distance will make lighting and composition easier. In macro, the longer the working distance, the easier it is to stay away from the subject which is helpful when the subject is some insect. You will be safer as well as not disturbing to the insect.
Depth of Field:
As one goes closer to the subject, the depth of field becomes smaller and smaller. At the closest distance, you won’t even be able to completely focus even a very small object. If shooting an insect or a flower, only a part of it will be in focus even though the whole subject is smaller than a centimetre. Even at higher f number say f22 or higher, the depth of field remains shallow. So you need to take multiple images with different parts of the object in focus and the merge all the images using some focus stacking software.
Requirements:
- You need just a camera and a Macro lens
- Better to use a tripod
- No requirement of a Studio
- Can be done in the comfort of your home
- Props/additional arrangements are optional
- Lighting, background are important but comfortably manageable. Natural window light is one easy option and for background, anything like colourful flowers (artificial or natural) or some green plants can prove to be interesting.
Settings:
The following tips may be helpful in taking macro shots:
- Aperture — for the very small subjects (one inch or smaller), it's best to use a lower aperture setting between f/11 and f/16. But if you are going for Focus Stacking, you can afford to open the aperture more.
- Shutter speed — with magnified macro shots, any movement is amplified in the picture. If using camera handheld, a speed of 1/320 or higher is ideal. On tripod, nothing to worry about if subject is totally still. So better to do it inside a room unless it is totally still outside. However, you should preferably use a Tripod with shutter release to achieve maximum sharpness. Turn on the mirror lockup if you want total sharpness.
- Focal Length — A focal length of around 90-105mm is often regarded as ideal for macro photography (and particularly so for full-frame cameras), as it allows you to get closer but not too close to what you're shooting. In case of insects, it’s better to keep distance.
- Use camera lens in manual focus mode as you need to focus on different parts of subject which is not possible with auto focus settings. In case of insects, auto focus mode is preferable.
- Background, arrangement and composition are important. In macro, the background is normally blurred.
- Lighting is the most important part - natural window light or defused/reflected light are the best. Flash light can also be helpful at certain times.
- You may try with back lighting, side lighting or you may experiment by moving light with slow shutter speed.
Technique:
When you are so close to an object and focus on it, you will get only a small part of the object in focus and rest of it will be totally out of focus. If you want whole object or a bigger part of an object in focus, you will have to take multiple shots by shifting focus minutely after each shot, thereby covering complete portion of the object that you want in focus. After taking multiple shots, say 5 to 10 shots, you will need to merge these photographs into one using some Focus Stacking software. The most commonly used software for Focus Stacking is Adobe Photoshop. Other good software is Helicon Focus.

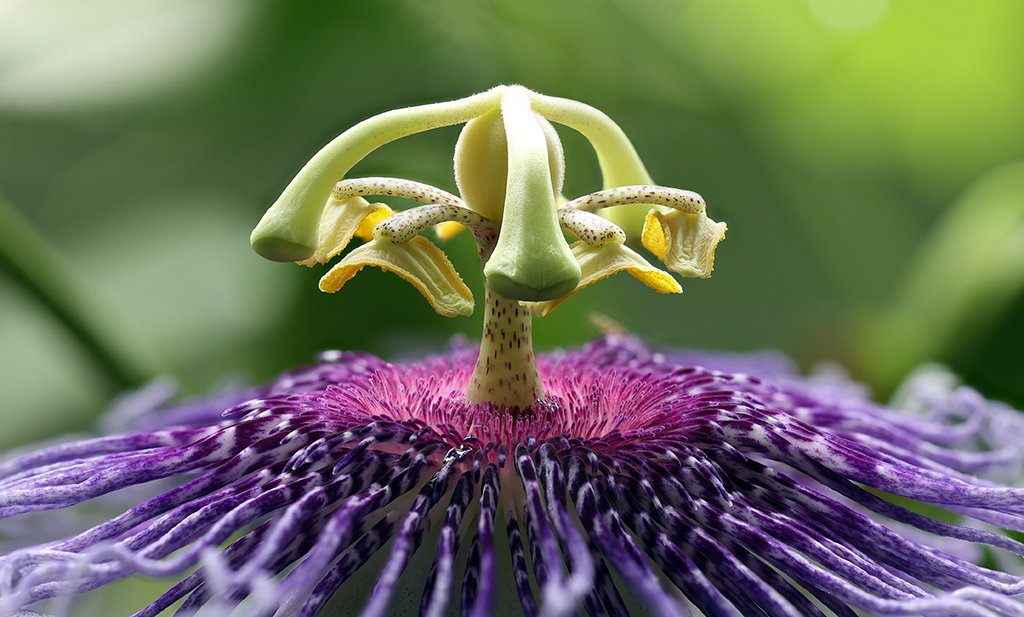
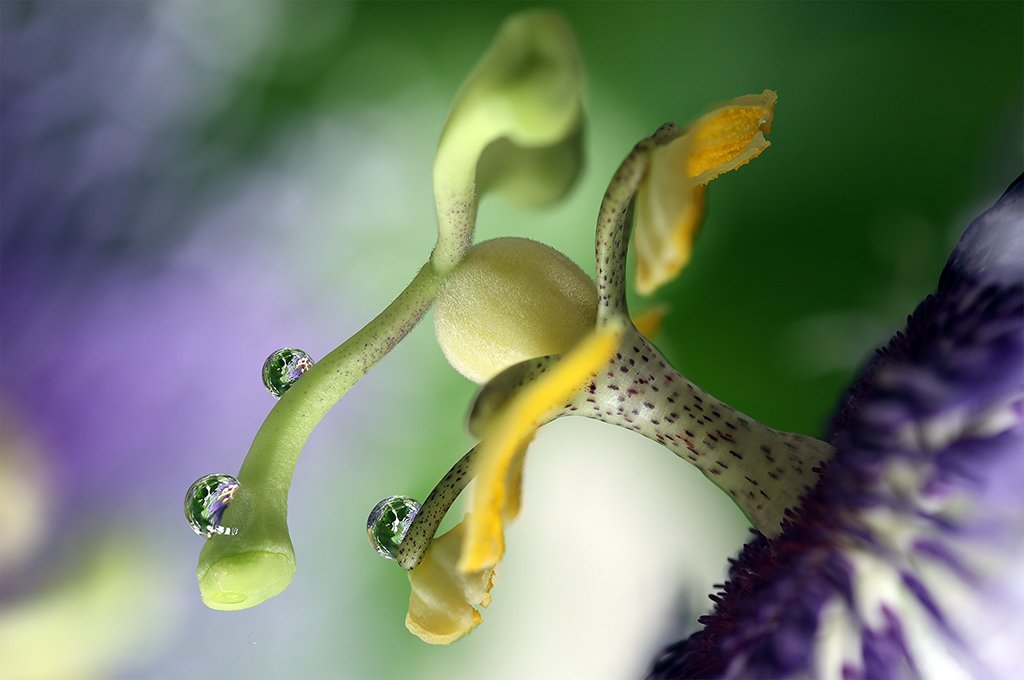
Pic - 3
Focus Stacking in Photoshop:
Open all the files you want to merge in Adobe Photoshop.
Go to File --> Automate --> Photomerge
Add open files
Select all the files in Layers window
Go to Edit ---> Auto-Align Layers
Then, Edit ---> Auto-blend Layers
It merges the focussed parts of all images into the final one.
Merge the layers and save the final focussed image.

Pic - 4

Pic - 5
In the series of images above, you will notice that only one of the water drops is in focus in different images. If we magnify it further, you will find that either the outer surface or the reflection inside the drops is in focus. You have to merge all these images into one using Focus Stacking software so as to get all the desired parts of the image in focus. After merging all the above images, the final output is shown below:

Pic - 6
To capture the complete Fly (Pic -7) in full focus, I had to take 10 shots with different parts in focus and then merged them using Focus Stacking software. Similarly, multiple shots of Dragonfly had to be merged for this photograph (Pic -8).
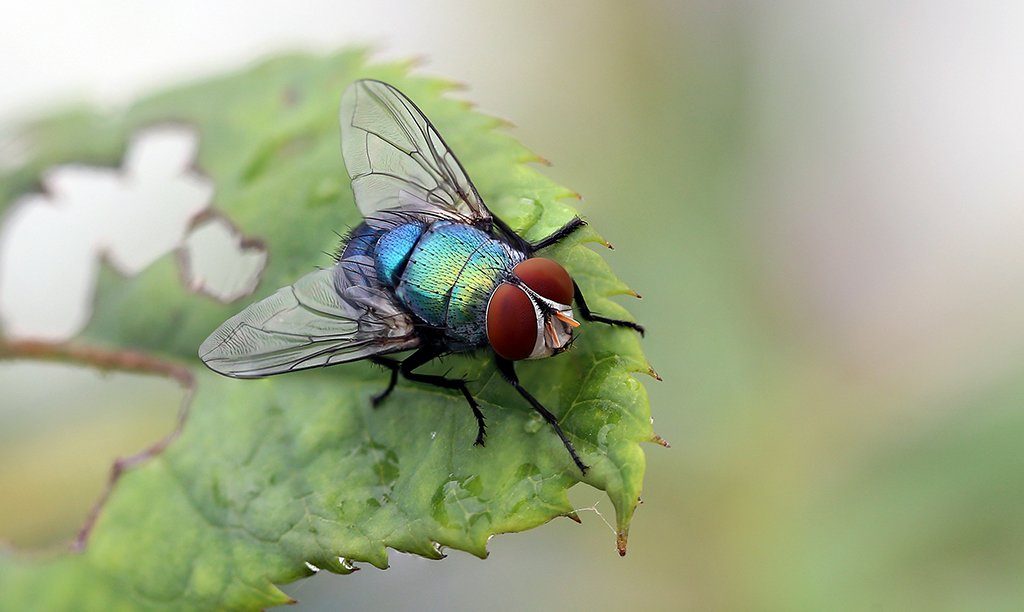

Pic - 7
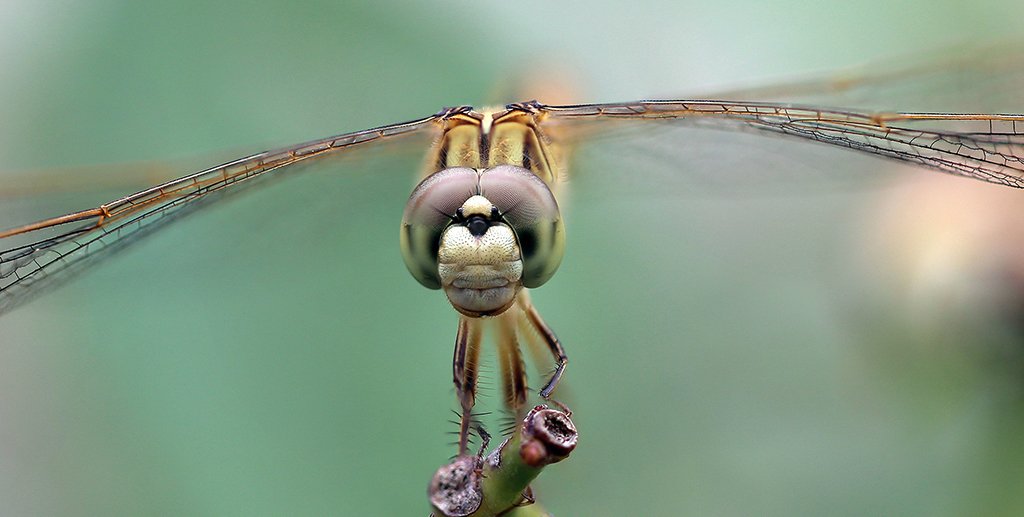

Pic - 8
Macro photography technique can be used for Nature, Product and Food photography.
There is lot of fun and creativity in Macro Photography. I hope you will enjoy it.
-------------------------------- x -------------------------------- x -------------------------------- x --------------------------------
List of Photographs:
Pic – 1: Macro shot of water drops on the stamen of Gladiolus flower.
Pic – 2: Macro shot of water drops on Gerbera flower.
Pic – 3: Passion flower
Pic – 4: Reflections in water drops on stem of a plant
Pic – 5: Six photographs with varying focus points
Pic – 6: Final output after photo stacking of above six photographs
Pic – 7: Photo stacked image of a Fly
Pic – 8: Photo stacked image of a Dragonfly